Film photography and Kase Filters with Lee Pengelly
Going against the tide. Film photography and Kase Filters with Lee Pengelly
“In this age of instant photography sometimes it’s nice to take the road less travelled”
Why on earth are you shooting film?! Is often the reaction I get from friends and the odd stranger that happens upon me whilst out shooting with my film camera.
With the myriad of technology we have at our disposal these days shooting film if often regarded as a backwards step. But for me it’s a chance to shrug off the modern world and immerse myself in a world of temperamental emulsions, but free of histograms, white balance and instant playbacks.
Using film is a whole different ball game compared to shooting digitally. Often the two mediums are compared but I think that is a mistake, they cannot be compared and there is little point in making comparisons with the two. Film has a different feel to it, for one it is tangible. You can look at your negatives and transparencies on a light box, hold them in your hand then file them away for easy access without having to power up a computer. The results are very different, not so clinical and clean as a digital file. That is part of the fun. In my mind you can’t beat a nice grainy black and white image, a pastel toned colour negative or a punchy transparency.
My introduction to film happened right at the start of my photographic career nearly 30 years ago. Starting right in at the deep end with Fuji’s infamous Velvia slide film. With very little to absolutely zero exposure tolerance, getting exposures right was imperative. When out shooting commercial subjects on a daily basis I had to get it right, no second chances. Despite this I did get it right and quickly learned how to put the film to best use.
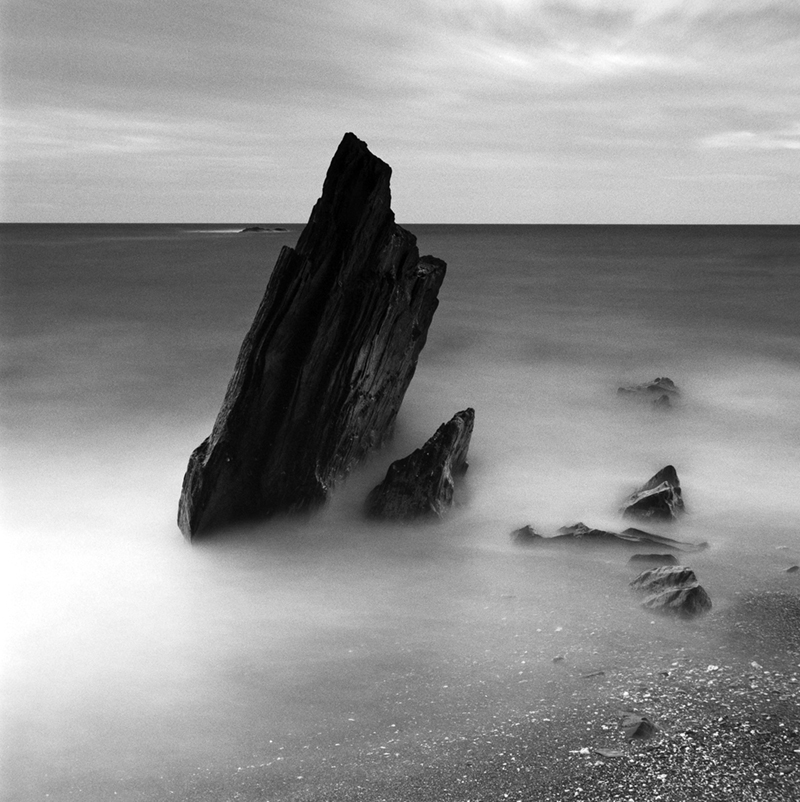
Westcombe rock, Devon. As the tide was coming in I had to retreat slightly up the beach and opted for a longer lens to shoot this scene. I used the Kase ND1000 to create a long 2 minute exposure. Bronica SQA, 80mm, Ilford HP5 plus 400. 2mins at F22
Formats.
Over the years I have shot pretty much every format, 35mm, medium format 6×4.5cm and 6x7cm as well as large format 5×4” and 6x17cm. The 5×4” and 6x7cm formats were perfect for reproduction, especially for the magazine and publishing markets. 35mm was great for speed but lacked the reproduction quality of larger formats.
As digital cameras came to the market my film cameras worked alongside for a time, but the switch to digital was inevitable commercially and sadly my film cameras took a back seat.
For many years I enjoyed the whole digital process, the speed, the hit rate and of course the cost savings !. I still do, as I continue to shoot digitally using my latest Canon camera, the fabulous EOSR.
But I hankered after the old magic of film. So around two years ago I bought a 5×4” camera again and started shooting film. As much as I love this format the cost of shooting large format 5×4” film has doubled if not tripled since the ‘old days’. Plus the aspect ration wasn’t challenging enough.
One format I had never tried was the square ratio, so recently I invested in a 6x6cm square medium format system.
“The square format has been a revelation and I cannot believe I hadn’t tried it before. I think I’ve found my format after all these years.”
Commercially the square format is a difficult one due to its dimensions. Magazines and the like all use the 5×4”/6x7cm ratio for covers for instance.
My switch to 6x6cm was done with a non-commercial outlook. My film work is now done more for pleasure than a commercial outcome. The freedom to shoot what I want is very liberating and I have quickly adopted the square format as my favourite ratio, especially for my landscape and architecture work. I find the 6×6 format very easy to compose with, plus there is no more decision to make on whether to shoot landscape or portrait. Some subjects don’t work but most do with some thought.
Film choice.
Fortunately film stock is still varied, some brands have disappeared but there is still a good choice both in colour and black and white. I tend to stick with a few favourite types for the work I do. Because I work in medium format the 120 roll film I use is still available although 220 roll film is now very rare. From a 120 roll I get 12 images per roll. Doesn’t sound very many does it ?. But its more than enough, certainly compared to shooting 5×4”.
For black and white I like Ilford Delta 100 for landscapes. A slow fine grained film which is great for long exposure work. When I need a more gritty look I prefer their HP5 plus 400 film. I also use Fomapan 100 and 400. For colour work I prefer Kodak Ektar 100 and Fuji Pro 400H. These films can be tricky to get right but when exposures are correct they produce lovely images. In terms of transparency films Fuji Velvia produces the vibrant punchy colours I like, but I also use Fuji Provia 100 when I need a more subtle approach.
Negative films,(both black and white and colour), behave better when you over expose rather than under expose. I use a handheld spot meter which is very accurate but tend to over expose when using ND filters with exposure times longer than 2 seconds. There is no real need to bracket exposures with negative films, although this depends on the subject. If unsure I will bracket if necessary but I find averaging my exposures readings from highlight and shadow areas gets it right pretty much every time.
Processing & Printing.
If you can find a lab that still processes film stick with them !. Ive used the same lab for nearly 30 years now and know that they get it right every time both in terms of processing and printing. Costs have increased and so have lead times due to the fact that film is rarer now and the machinery to produce the films is expensive to run.
I now process my black and white and colour negatives at home with a very basic set up. Home processing can be a daunting prospect but it is very straightforward and requires very little equipment and chemicals. No need for a darkroom, I just use a light tight changing back to load the film into a developing tank, from then on everything is done in the light.
To develop film I use an app on my phone – Master Dev. This app is very useful, it has development times for every film you can think of along with chemical measurements and temperatures.
Once processed, dried and cut into strips I then scan my film with my digital camera a Lightbox and negative mask. This produces a RAW file big enough to print out at A2. Many years ago I used a flatbed scanner but have found that the camera method produces much better results.
The scans are then run through Negative Lab Pro – a Lightroom plug in. This converts the negative to positive then allows post production of the image. From here I then move onto Photoshop to clean the image and very minimal post work such as levels and curves. The resulting image is then saved as a TIFF master file.
There is something about seeing your work in print. Having prints made from your film images is no exception. Yes you can see the grain sometimes but that is one of the characteristics I love about film. The resulting prints are gorgeous and have a definite film look to them, compared to digital reproductions.
What to shoot.
It is more about knowing what not to shoot. Certain subjects are very tricky for film cameras. Shooting into strong light can be tricky, especially capturing the dynamic range of the scene. I much prefer side lit subjects, where capture of the range of tones is easier. This also avoids the use of heavy filtration which can look more obvious. Backlit and front lit scenes can work well with most films too.
Colour casts are sometimes unavoidable, especially with slower transparency films. Most films have a reciprocity failure where colours tend to shift off to more cooler and magenta tones. When using strong ND filters this can amplify this colour shift, so a quick check of reciprocity times for each film is good practice. I use a Reciprocity Timer app which lists every film I use complete with adjusted exposure times for each one.
Filtration.
I have always used filters from my first forays into photography to the current time. Even with digital technology and the ability to merge and blend exposures I prefer to get the shot right in camera and to that end I prefer to use physical filtration.
Using film cameras and filters goes hand in hand, controlling the exposure whilst shooting film is a necessity in my opinion. The filters I use control the light rather than colour it. They help to balance exposure, extend exposure and reduce colour shifts.
Let’s start with graduated filters. I use Kase ND graduate filters in 0.9 and 0.6 strength both in hard and soft gradation. I find 2 stop and 3 stop grads very useful in balancing land and sky exposures, erring towards the 0.6 mainly as it is not too strong and visible.
Neutral Density (ND) filters are overall neutral grey and are used to extend exposure times generally. I use three different strengths, Kase ND1000 (x10 stop), ND64 (x6 stop) and ND 16 (x4 stop). I am often shooting exposures from several seconds to several minutes using these filters. When using colour films the shift, or reciprocity failure shows up as deep blue to magenta casts. To correct for this I sometimes use a warming filter in the 81 or 82 series. There is no white balance setting on my medium format camera !.
A polariser is by far the most useful filter. Again to control contrast but also to add saturation, remove glare and improve the image overall.
For my black and white work I use the polariser frequently, along with ND’s and ND grads. Red and orange filters are also used to boost up tones in the resulting images. Red filters improve overall contrast and boost skies turning them almost black. Orange filters do the same job although not so pronounced. Both these filters have an exposure factor to allow for. For instance the red filter needs 4 stops of compensation.
On the surface it would seem that shooting film comes with many pitfalls; cost per shot, reciprocity failure, physical damage to negatives and transparencies and all in all a lot more work to seemingly get the final result – not to mention that you don’t see what you are shooting at the time. But this is all part of the fun and the final image when everything goes to plan is very rewarding.
“I actually like the anticipation of waiting for the results, the whole process of finding the composition, exposing and developing, to finally seeing the result gives me great joy.”
Lee Pengelly.
You can follow Lee’s work via his website and social media feeds below. Lee has a new website dedicated to his film work coming soon.
www.filmsquared.co.uk
www.leepengelly.com
Instagram – @leepengelly
Twitter – @leepengelly
YouTube – Lee Pengelly Photography